Thursday, May 19, 2016

Using a Dynamic Alarm to Rescan Unavailable Datastores

Hi All,

So in our particular retail environment we have had an ongoing issue with Iscsi datastore availability in the case of a power outage.   We also have the same problem on in store deployments when the onsite technicians power on the components in the wrong order (ie power on the hosts before the iscsi array).   The result of this problem was of course escalations for retail stores being down for a significant period of time following a power outage.

Of course I googled the heck out of this problem -  and the only solution I have found was to change the boot delay on the ESXi hosts to exceed the array boot time.  That was not a great solution for us -  because it would delay starts on planned reboots without a corresponding power outage.

One day I was working on another reactive alarm and I got that light bulb over my head.   I thought "I wonder if there is an alarm type for datastore connectivity to hosts that I could use to trigger an action?".   It turns out there is a condition that can be monitored at the datastore level to alarm for this -  it is called Datastore State to All Hosts. In the screenshots below -   I created a custom rule with this condition.   For a review on setting up Powercli based alarms -  refer to my blog post here.


Now that we have the alarm setup  -   let's get into the Powercli code behind it.  In our particular implementation -  we only have to worry about 3 nodes in our clusters,  so my script is focused on that,   the methodology would also work with a larger cluster and a foreach-object loop -  but I am just going to use my already written script to show how I solved my particular problem, but the logic will scale.
# In response to a datastore alarm, remove all snapshots on the datastore.
# This is just for demonstration purposes.
# Find more info at http://blogs.vmware.com/vipowershell
$basePath = "C:\Documents and Settings\All Users\Application Data\VMware\VMware VirtualCenter\scripts"
$ProgressPreference = "SilentlyContinue"
$env:APPDATA = "c:\Documents and Settings\All Users\Application Data"

Add-PSSnapin VMware.Vimautomation.Core -ea SilentlyContinue
$WarningPreference = "SilentlyContinue"
Connect-VIServer localhost -User "nobody\someone" -Password "xxxxxxxxxxxxxxxxxxxxxx" | Out-Null
$email = "jason.willey@gmail.com"
$datastoreId = "Datastore" + $env:VMWARE_ALARM_TARGET_ID
$datastore = Get-Datastore $datastoreId
$impactedhosts = $datastore |get-vmhost
$cluster = $impactedhosts |select -First 1 |get-cluster 
# host one check
$Hostone = $impactedhosts |where {$_.name -match "x1"}  
$Hostoneconnected = $Hostone.ConnectionState
$hostonestate = get-vmhost $hostone |get-datastore $datastore
$hostonestate = $hostonestate.Accessible
if ($Hostoneconnected -match "connected") {
$hostonestate = get-vmhost $hostone |get-datastore $datastore
$global:hostonestate = $hostonestate.Accessible }
#host two check
$Hosttwo = $impactedhosts |where {$_.name -match "x2"}  
$Hosttwoconnected = $Hosttwo.ConnectionState
if ($Hosttwoconnected -match "connected") {
$hosttwostate = get-vmhost $hosttwo |get-datastore $datastore
$global:hosttwostate = $hosttwostate.Accessible }
# Host Three check
$Hostthree = $impactedhosts |where {$_.name -match "x3"}  
$Hostthreeconnected = $Hostthree.ConnectionState
if ($Hostthreeconnected -match "connected") {
$hostthreestate = get-vmhost $hostthree |get-datastore $datastore
$global:hostthreestate = $hostthreestate.Accessible}
#  starting rescan loop
$global:counter = 0 
while ($global:hostonestate -match "False" -or $globalhosttwostate -match "False" -or $global:hostthreestate -match "False" -and $counter -lt 10 {
if ($global:Hostonestate -match "False") {Get-VMHostStorage -VMHost $Hostone -RescanAllHba -RescanVmfs |Out-Null
 $global:hostonestate = get-vmhost $hostone |get-datastore $datastore;
 $global:hostonestate = $$global:hostonestate.Accessible  }
if ($global:Hosttwostate -match "False") {Get-VMHostStorage -VMHost $Hosttwo -RescanAllHba -RescanVmfs |Out-Null
 $global:hosttwostate = get-vmhost $hosttwo |get-datastore $datastore;
 $global:hosttwostate = $global:hosttwostate.Accessible  }
if ($global:Hostthreestate -match "False") {Get-VMHostStorage -VMHost $Hostthree -RescanAllHba -RescanVmfs |Out-Null
 $$global:hostthreestate = get-vmhost $hostthree |get-datastore $datastore;
 $global:hostthreestate = $global:hostthreestate.Accessible  } 
sleep 120
$global:counter = $global:counter + 1
if $counter -eq 9 { $global:hosterror = "$datastore has been rescanned every 2 minutes for 20 minutes and is not available on all nodes of $cluster"

}
if ($globbal:hosterror -ne $null) {Send-MailMessage -To $email -Subject "Unable to rescan ISCSI storage in cluster $cluster" -Bodyashtml -Body "$global:hosterror"  -SmtpServer "m.nobody.com" -From "VMware@nobody.com"}


So I will skip all the logic for interpreting the alarm received as that is detailed in another post here.

First things first - I translate the actual datastore ID presented by the alert to a more script friendly datastore name and get the hosts that are supposed to be connected to this datastore. I also get the cluster name for use later on when we send an email alert in the case we were unable to successfully rescan.
$datastoreId = "Datastore" + $env:VMWARE_ALARM_TARGET_ID
$datastore = Get-Datastore $datastoreId
$impactedhosts = $datastore |get-vmhost
$cluster = $impactedhosts |select -First 1 |get-cluster 
From there - I now verify that each host is actually connected to vcenter, and verify if the datastore is viewed as available from the host side. I then repeat this logic for each possible host.
$Hostone = $impactedhosts |where {$_.name -match "x1"}  
$Hostoneconnected = $Hostone.ConnectionState
$hostonestate = get-vmhost $hostone |get-datastore $datastore
$hostonestate = $hostonestate.Accessible
if ($Hostoneconnected -match "connected") {
$hostonestate = get-vmhost $hostone |get-datastore $datastore
$global:hostonestate = $hostonestate.Accessible }
Now I set up the rescanning loop. In the case of our environment we have chosen to rescan every two minutes for twenty minutes and then send an email alert to second level support. I used $global: variables here so they will survive the loop. So after the rescan, it checks the status of the datastore again, and continues running the loop until all the datastores have returned, or the loop counter reaches 10. At the end of each pass of the loop there is a 120 second sleep to give us our two minutes between rescans. One the last iteration of the loop - it writes an error message that after 20 minutes of 2 minute rescans - the cluster still has a datastore availability problem.
$global:counter = 0 
while ($global:hostonestate -match "False" -or $globalhosttwostate -match "False" -or $global:hostthreestate -match "False" -and $counter -lt 10 {
if ($global:Hostonestate -match "False") {Get-VMHostStorage -VMHost $Hostone -RescanAllHba -RescanVmfs |Out-Null
 $global:hostonestate = get-vmhost $hostone |get-datastore $datastore;
 $global:hostonestate = $$global:hostonestate.Accessible  }
if ($global:Hosttwostate -match "False") {Get-VMHostStorage -VMHost $Hosttwo -RescanAllHba -RescanVmfs |Out-Null
 $global:hosttwostate = get-vmhost $hosttwo |get-datastore $datastore;
 $global:hosttwostate = $global:hosttwostate.Accessible  }
if ($global:Hostthreestate -match "False") {Get-VMHostStorage -VMHost $Hostthree -RescanAllHba -RescanVmfs |Out-Null
 $$global:hostthreestate = get-vmhost $hostthree |get-datastore $datastore;
 $global:hostthreestate = $global:hostthreestate.Accessible  } 
sleep 120
$global:counter = $global:counter + 1
if $counter -eq 9 { $global:hosterror = "$datastore has been rescanned every 2 minutes for 20 minutes and is not available on all nodes of $cluster"
}
The last step once the loop has been terminated is to check if the error message has been populated - send an email out to the second level support team letting them know that automatic rescanning has not been successful.
if ($globbal:hosterror -ne $null) {Send-MailMessage -To $email -Subject "Unable to rescan ISCSI storage in cluster $cluster" -Bodyashtml -Body "$global:hosterror"  -SmtpServer "m.nobody.com" -From "VMware@nobody.com"}
I am hoping that you find this useful, as I have heard this is a very common problem, especially with Iscsi implementations. Leave me a comment if you have any questions or suggestions, or just leave a comment if you had a similar problem and solved it in a different way.

Wednesday, May 4, 2016

Powercli VM hardening script

Someone on the Linkedin Powercli Forum (a great group) asked if anyone had a VM hardening script.   I was working on one based on the output of our VROPs implementation.   This may not contain all of the settings available in the hardening guide,  but it did take care of most of the ones that VROPS was alerting on.  

One important caveat :   the vm needs to be shut down when you run this script, as all the advanced settings are locked while the VM is running.  


Param(
  [Parameter(Mandatory=$True,Position=1)]
  [string]$targetvm
)
$vm = Get-VM $targetvm
$vm  |New-AdvancedSetting -name 'log.keepOld' -Value 10 -confirm:$false
$vm  |New-AdvancedSetting -name 'isolation.tools.ghi.launchmenu.change' -Value false -confirm:$false
$vm  |New-AdvancedSetting -name 'isolation.device.edit.disable' -Value false -confirm:$false
$vm  |New-AdvancedSetting -name 'isolation.tools.hgfsServerSet.disable' -Value false -confirm:$false
$vm  |New-AdvancedSetting -name 'isolation.toolsautoInstall.disable' -Value false -confirm:$false
$vm  |New-AdvancedSetting -name 'isolation.tools.unity.push.update.disable' -Value false -confirm:$false
$vm  |New-AdvancedSetting -name 'isolation.tools.disk.Wiper.disable' -Value false -confirm:$false
$vm  |New-AdvancedSetting -name 'isolation.tools.ghi.protocolhandler.info.disable' -Value false -confirm:$false
$vm  |New-AdvancedSetting -name 'RemoteDisplay.maxConnection' -Value 2 -confirm:$false
$vm  |New-AdvancedSetting -name 'isolation.tools.vmxDnDVersionGet.disable' -Value false -confirm:$false
$vm  |New-AdvancedSetting -name 'isolation.bios.bbs.disable' -Value false -confirm:$false
$vm  |New-AdvancedSetting -name 'isolation.unity.taskbar.disable' -Value false -confirm:$false
$vm  |New-AdvancedSetting -name 'isolation.tools.diskShrink.disable' -Value false -confirm:$false
$vm  |New-AdvancedSetting -name 'isolation.tools.unity.windowContents.disable' -Value false -confirm:$false
$vm  |New-AdvancedSetting -name 'isolation.tools.unityInterlockOperation.disable' -Value false -confirm:$false
$vm  |New-AdvancedSetting -name 'isolation.tools.ghi.trayicon.disable' -Value false -confirm:$false
$vm  |New-AdvancedSetting -name 'isolation.tools.vixMessage.disable' -Value false -confirm:$false
$vm  |New-AdvancedSetting -name 'isolation.tools.ghi.autologin.disable' -Value false -confirm:$false
$vm  |New-AdvancedSetting -name 'isolation.device.connectable.disable' -Value false -confirm:$false
$vm  |New-AdvancedSetting -name 'isolation.monitor.control.disable' -Value false -confirm:$false
$vm  |New-AdvancedSetting -name 'isolation.tools.memSchedFakeSampleStats.disable' -Value false -confirm:$false
$vm  |New-AdvancedSetting -name 'log.rotateSize' -Value 1024000 -confirm:$false
$vm  |New-AdvancedSetting -name 'isolation.tools.unityActive.disable' -Value false -confirm:$false
$vm  |New-AdvancedSetting -name 'isolation.tools.getCreds.disable' -Value false -confirm:$false
$vm  |New-AdvancedSetting -name 'isolation.ghi.shellAction.disable' -Value false -confirm:$false
$vm  |New-AdvancedSetting -name 'isolation.tools.trashFolderState.disable' -Value false -confirm:$false

so I wrote this with the parameter -targetvm as a parameter. Then I can call it on any subset of machines I choose such as Get-folder dev |get-vm |foreach-object {./vmsecurityupdate $_.name} 

Most of the parameters above were recommended against "default build" VMs, so it is likely if you you ran the VROPs VM hardening alert you might see the same reccomendations. You may want more settings.. or maybe less depending many business factors. The easy way to plan your settings is to do a get-advancedsetting vmname |select *  and find out what setting are important to you or your organization.    My long term goal is to get this script into our build automation so every VM we push out would have an improved security posture.

I hope this helps out.

Friday, April 22, 2016

Creating a reactive alarm for ESXi ROBO cluster or as I call it "DRS-light"

I have decided to start blogging again after a long time away. Eight years to be precise.
The first item I want to share is a solution for a problem that occured in my company's Retail implementation that uses VMware ROBO licensing. For anyone that is familiar with ROBO -  you know that there is one major exclusion that makes cluster management challenging - and that is the lack of DRS. In any large scale implementation without DRS I think it is  fairly common to end up with unbalanced workloads after maintenance or outages.   This problem is compounded when you have a large support team of varying skill levels.

How I chose to address this problem was to create an alarm based on Host Memory Usage,  as Host memory is generally the first problem that occurs in our particular environment.  This methodology would also work for CPU constraints, but that is not a problem we had.

My starting point was the excellent article from the Powercli blog on using Powercli scripts in actions. 

One thing to note :  the syntax suggested in the article for the actual alarm action did not work for me  - so I used the following path to execute the Powershell code with the alarm :

in case that type is tool small to read -  I used the following to call Powershell
 (instead of the batch file method suggested in the original article) :
c:\windows\system32\WindowsPowerShell\v1.0\powershell.exe 


Here is the full code of the script I am using -   I will detail out the the purpose section by section (starting at line 1 as the rest is covered in the original blogpost by VMware pretty pretty well:
# In response to a host alarm, add a VM to that host.
# This is just for demonstration purposes.
# Find more info at http://blogs.vmware.com/vipowershell
$basePath = "C:\PS_SCRIPTS\Alarms"
$ProgressPreference = "SilentlyContinue"
$env:APPDATA = "c:\Documents and Settings\All Users\Application Data"

## Import the admin credential.
#. "$basePath\credentialManagement.ps1"
#$credential = Import-PSCredential "$basePath\systemCredentials.enc.xml"

# Log in.
Add-PSSnapin VMware.Vimautomation.Core -ea SilentlyContinue 
$WarningPreference = "SilentlyContinue"
Connect-VIServer localhost -User "somedomain/someuser" -Password "xxxxxxx"
$hostId = "HostSystem-" + $env:VMWARE_ALARM_TARGET_ID 
$vmhost = Get-VMHost -Id $hostId 
$cluster = Get-VMHost $vmhost |Get-Cluster 
$vm = get-vmhost $vmhost |get-vm |where {$_.name -ne "z*"}|sort-object memorygb -descending |select -first 1 
$destination = get-cluster $cluster |get-vmhost |where {$_.name -ne $vmhost} |sort-object MemoryUsageGB |select -first 1 
$destinationfree = ($destination.MemoryTotalGB - $destination.MemoryusageGB) 
$vmhostfree = ($vmhost.MemoryTotalGB - $vmhost.MemoryUsageGB) 
$vmsize = ($vm.memoryGB) 
$difference = ($destinationfree - $vmhostfree)
if (($difference - $vmsize) -gt 0) { Move-VM -VM $vm -Destination $destination -Confirm:$false} 
$count = $cluster |get-vmhost
$count = $count.count
else {Send-MailMessage -To "somepeople@somecompany.com" -Subject "Unable to Balance Retail Cluster $cluster - $date" -Body "Unable to balance Cluster $cluster due to insufficient resources available. There are currently $count Host(s) available in the Cluster."  -SmtpServer "m.somecompany.com" -From "vmware_team@somecompany.com" }

Now I will break down what the various lines of the script are doing :
$hostId = "HostSystem-" + $env:VMWARE_ALARM_TARGET_ID 
$vmhost = Get-VMHost -Id $hostId 
$cluster = Get-VMHost $vmhost |Get-Cluster
These three lines are taking the Alarm value ($env:VMWARE_ALARM_TARGET_ID) and converting it to a more usable form for Powercli commands.   In this case the alarm returns the hostId number, but without the prefix to query it using get-vmhost.  So the first operation I do is add the HostSystem- to the id to make it easier to query.   Then I retrieve the object for the vmhost and the cluster for future actions :
$vm = get-vmhost $vmhost |get-vm |where {$_.name -ne "z*"}|sort-object memorygb -descending |select -first 1 
The next objective is to get the list of VMs on the host that is having memory pressure  and sort it based on the most memory usage.   The line where {$_.name -ne "z*"} is not necessary in most environments, but in our case we have a guest that starts with z that is considered "immobile"  :
$destination = get-cluster $cluster |get-vmhost |where {$_.name -ne $vmhost} |sort-object MemoryUsageGB |select -first 1 
This next lines then find the host in the cluster with the most memory free and stores that variable for a later calculation :
$destinationfree = ($destination.MemoryTotalGB - $destination.MemoryusageGB) 
$vmhostfree = ($vmhost.MemoryTotalGB - $vmhost.MemoryUsageGB)
$vmsize = ($vm.memoryGB)  
Then the current Host free and VM guest memory usage, and difference between the source and destination host are stored as variables for calculations :
$difference = ($destinationfree - $vmhostfree)
if (($difference - $vmsize) -gt 0) { Move-VM -VM $vm -Destination $destination -Confirm:$false} 

Now all the collected variables are used to calculate if you should move the vm to another host. The If statement is used to make sure that you will not move a VM to another host with less available memory than the original host:
$count = $cluster |get-vmhost
$count = $count.count
Now we gather some data in case we were unable to move a vm (such as if there is no other node with more free RAM) :
else {Send-MailMessage -To "somepeople@somecompany.com" -Subject "Unable to Balance Retail Cluster $cluster - $date" -Body "Unable to balance Cluster $cluster due to insufficient resources available. There are currently $count Host(s) available in the Cluster."  -SmtpServer "m.somecompany.com" -From "vmware_team@somecompany.com" }
The last step is now to send an email to the support team with some context around the error message so they can investigate.   This is to cover in case a cluster is missing nodes.   

So that is my solution for balancing memory in a DRS-less ROBO environment  

If you have any thoughts or suggestions -  please comment.

Thursday, October 23, 2008

VMware EVC - incompatible ?

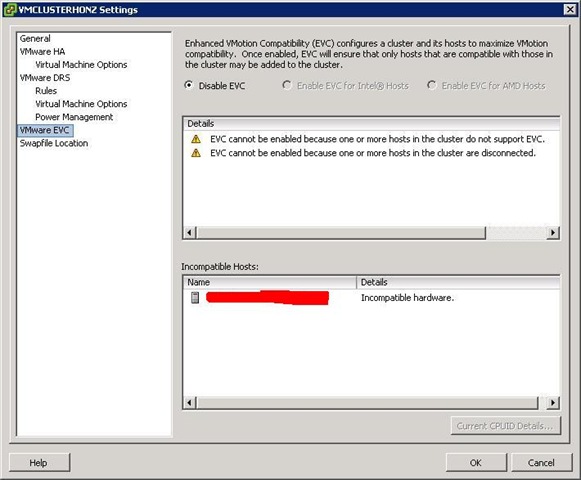
When installing some brand spanking new DL585 Quad Core systems I was unable to initially enable EVC for the new servers.   Both new servers were showing as having incompatible hardware.
EVC1
The answer was the No Execute Page Protection being disabled by default.  I was also surprised to find that the AMD Virtualization support was also disabled by default.   I also saw some posting in the VMware forum that other newer HP models have the same default setting.  Once the settings were adjusted,  EVC was no longer reporting incompatible hardware. 

Friday, September 26, 2008

VMware 3.5u2 Hardware Monitoring

In the ESX 3.5u2 release notes there is a brief blurb about the display of system health information:

"Display of System Health Information – More system health information is displayed in the VI Client for both ESX Server 3.5 and VMware ESX Server 3i."

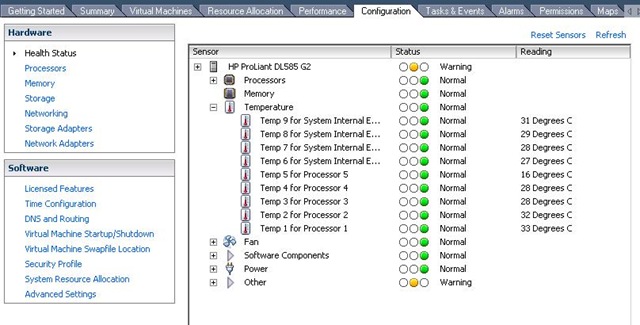
I don't think that blurb did this feature justice.  

HealthStatus

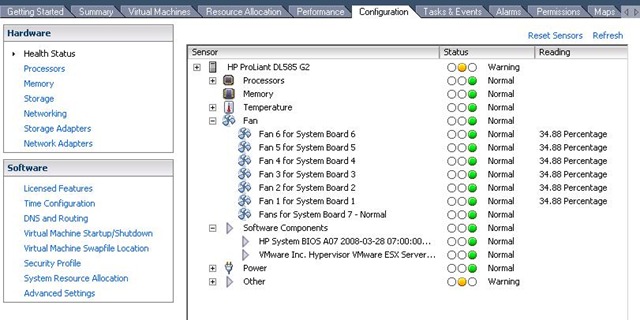
Expanding some of the nodes shows a surprising level of detail.

healthstatus2 

healthstatus3

I think VMware definitely undersold this feature in the release notes.  

Thursday, September 25, 2008

VMware Upgrade Manager - Using Baselines to Check Patch Compliance and Perform Remediation

Patching servers or guests using VUM is based on application of baselines.  You can apply baselines at any level in the hierarchy of  Hosts & Clusters for Host based updates or at any level of the hierarchy of Virtual Machines and Templates for Guest based updates.   Baselines can either be static or dynamic,  and can be manipulated via the baseline tab of VUM.  In the screen shot below it shows the default baselines created by VUM,  which are all dynamically updated baselines.  

baseline14

If you choose to create a new baseline you can customize it for Host or Guest Updates,  whether the baseline is  Fixed or Dynamic.  After selecting these criteria, this is where creating a baseline gets interesting.  You can select products, update severity, language, date range criteria, and which vendor updates your baseline will include.   Currently vendors include VMware, Microsoft, Apple, Mozilla, and Adobe.  That is a much larger list than I expected.     You can also choose specific updates to include or exclude on subsequent screens.  

 baseline15

You can also check patch details from the subsequent inclusion/exclusion screen  (or from the update repository tab).  I chose this update in particular to display, because I was surprised to find in among the included updates. 

baseline16

Now that we have created baselines or used the default baselines,  now it is time to attach them.   If you want to applying a baseline to an ESX host,  you would apply them in the Hosts and Clusters view of the inventory.   If you are choosing to apply guest based baselines then you would apply them in the Virtual Machines and Templates.   You can apply them at any container level within the hierarchy.   I chose to deploy our host based baselines at the datacenter level.

baseline4

when you attach the baseline you will be asked to select which applicable baseline you wish to apply to the selected container.   Once the baseline is applied you will get a view that shows the number of hosts that are compliant with the baseline, the number that are not compliant,  and the unknown servers (which have not yet been scanned)

baseline6

Now from each host (or guest) you will now have additional options in the context menu, Scan for Updates and Remediate.

baseline7 

before you scan for updates,  make sure that your update repository has already been populated.  When I scanned without a populated repository,  I received and error stating that  the scan could not be completed.  You can scan from any level in the hierarchy that has an applied baseline.  For the purposes of this blog, I scanned at an individual host level.  Once the scan has been completed, you will now see an updated screen showing you the updates compliance status based on your scan.

baseline8

Now it's time to remediate.   clicking remediate will bring up a wizard, asking you to select the baselines that you will be applying.  and allows you to select include or exclude updates contained within the baselines. baseline11

Now you are asked for when you will apply the updates, and you can have an opportunity to adjust the default failure options.

baseline12

Normally I wouldn't publish a confirmation screen,  but there is one specific thing I would like to point out.   This is the only place in this wizard where you can see the scope of the update remediation.   Since this tool will try to force your servers into maintenance mode, including rebooting servers that are unable to enter maintenance mode (if you have selected that option),  it is good to confirm that the scope is limited to what you have intended to patch.  

baseline13 

You will now see a task for remediation on the selected hosts, and after it is completed, you will be able to see an event for each patch applied as well as events for entering maintenance mode, and rebooting the server.   

In my opinion the time spent configuring VMware Update Manager is time well spent, as it will save much more time in the long run.  It's very nice to see VMware follow in the footsteps of Microsoft SUS and WSUS in making a free patch management tool, as opposed to going in the direction of "paid updates" model.       

Tuesday, September 23, 2008

Configuring VMware Update Manager

As mentioned yesterday, in this post I will discuss how I have configured VMware Update Manager, and even show some of the options that I chose not to configure.  

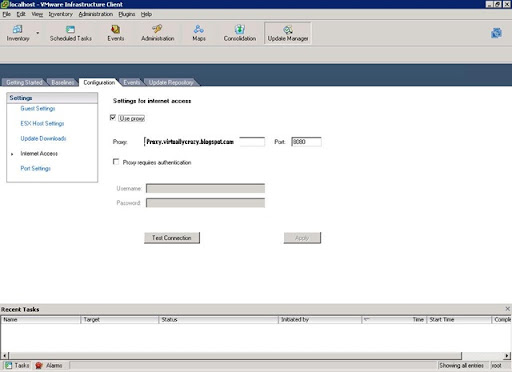
First configuration option that I set, and possibly the most important, depending on your network design was the proxy configuration.   Instead of redacting the server names, I will be replacing them with fake names.  One thing to take note of -  VUM does not support proxy auto-detection.  If you have a proxy, you will need to configure it here.

vum14

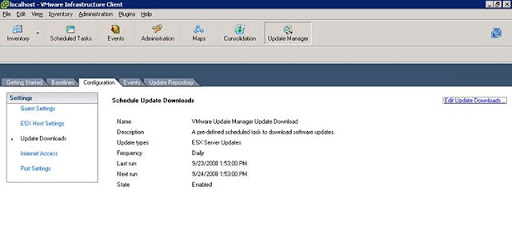
Once you have configured your proxy, you can go to the update downloads to configure what will be downloaded and when.

vum15

If you click on the Edit Update Downloads object, it will present you with a wizard for configuring which updates you want , and when it will retrieve them.   In our environment we already have a very good solution for patching all of our servers, so we will be only downloading ESX host updates. 

vum16

At this point you can set your schedule,  you can setup one time updates, at server startup, hourly, daily, weekly, and monthly.  At this time it appears that you can only have one update job per implementation of VUM, so plan accordingly.

vum17

Now you can enter email addresses for people that you would like to be notified of new updates.

vum18

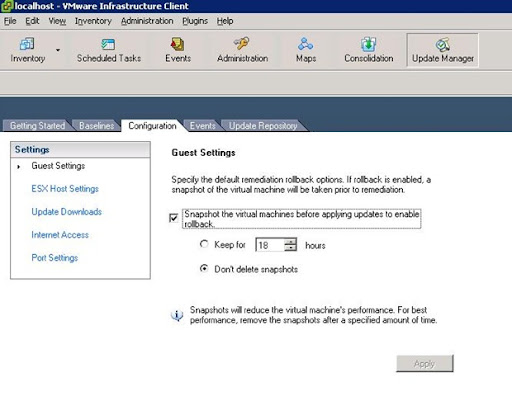
You can also configure options around guest and host updates.    You have the option to snapshot the virtual machines before applying the updates, allowing an easy fallback in the case of an virtual machine having issues from a patch update.   You can also choose to keep that snapshot for up to 100 hours, or to not automatically delete it.  

vum19

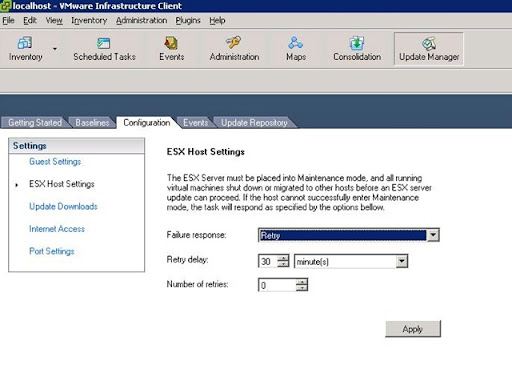
In the ESX Host Settings, VUM reminds you that host patches are only installed when an ESX server is in maintenance mode and prompts you for how to react to not being able to place the server in maintenance mode.   It can Fail the Task (writing an event),  Retry the job, Power Off and Retry, and Suspend and Retry. All the retry options include the   ability to limit the number of retries and insert a delay between retries.

vum20

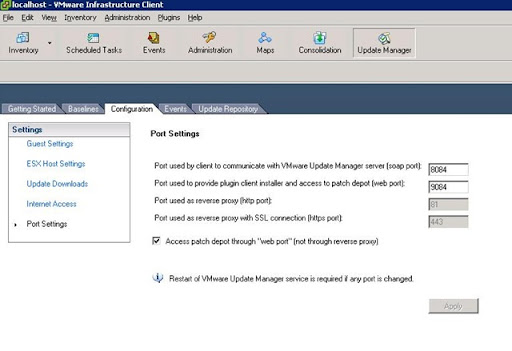
One last configuration screen is Port Settings.   If you had any need to change the ports that VUM is using to communicate, here is where it would be done.   I wouldn't recommend changing them unless you have a specific security requirement.

vum21

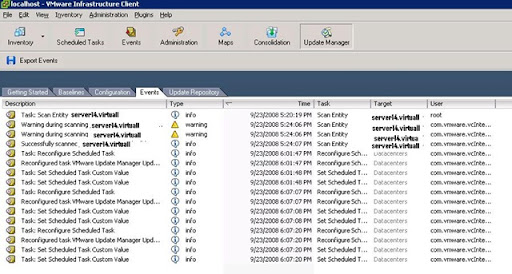
Now that you have VUM configured, you can check the Events tab for information on update downloads, scanning and updates to VUM configuration

vum22

One other support tool that is included on the server where you installed VUM is the Generate Update Manager log bundle tool.   This tool creates a zip file on your desktop with all the logs and configuration files for VMware Update Manager that you can either examine or forward on to your VMware support.   By default this icon is in the root of VMware folder under Program Files.

In my next post I will go over the VMware Update Manager repository and the information available there, as well as creating, editing, and using baselines.  

Monday, September 22, 2008

Installing VMware Update Manager

So I was installing VMware Update Manager on my existing Virtual Center server, so I thought I would share the installation experience.   Before installing,  make sure to check out VMware's Release Notes.   It also can't hurt to read through the Administrator's Guide

I used the zip file for Vmware-VIMSetup2.5.0-104263.

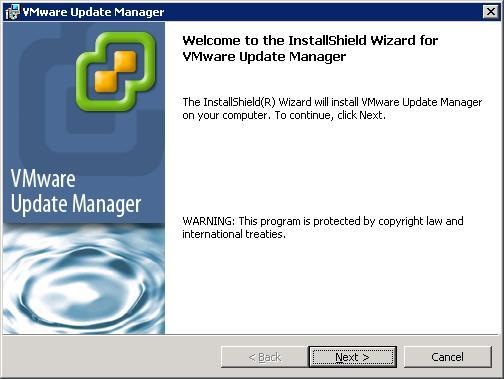
First you run VMware-Update-Manager.exe from the \updatemanager directory to start the installation.vum

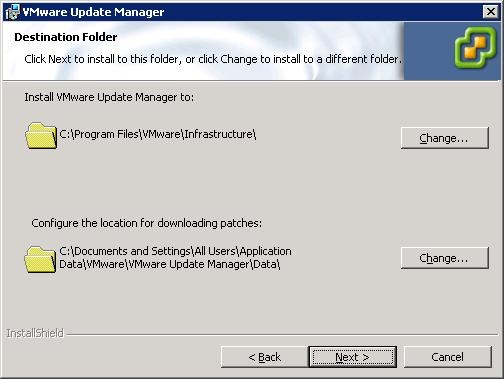
After thoroughly reading the legal notice and accepting it, you are prompted to select your installation folder and your folder for downloaded patches.  

vum2 

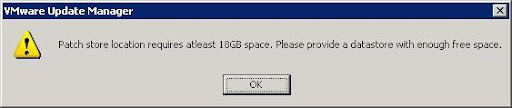
The directory for downloading patches needs to have at least 18GB of space, or you will be forced to choose another location.

vum3

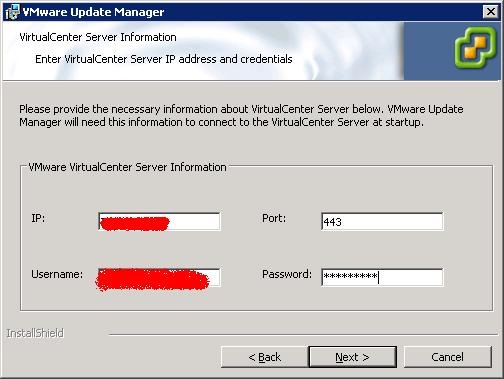
Now you will be prompted for a Virtual Center login. 

vum4

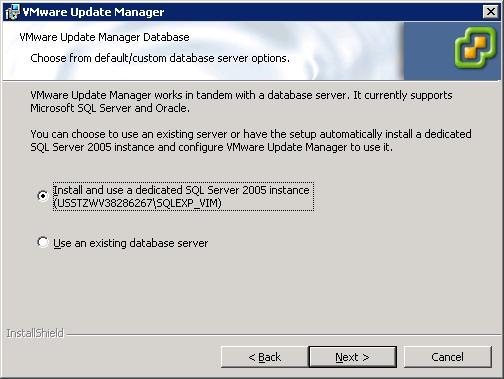
Now you will be asked for which type of database you will use.   You can use either locally installed SQL Express, SQL (via ODBC), or Oracle.

vum5

We chose SQL server, so at this point you are prompted to create a DSN. 

vum6

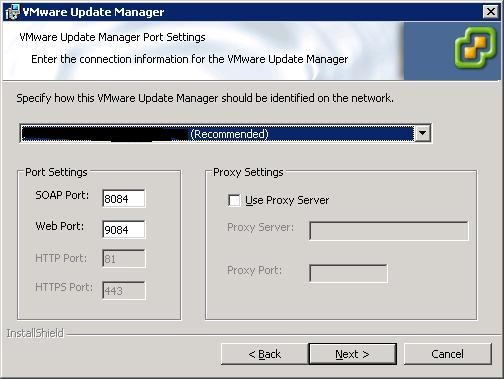
confirm or change the default ports and server name.   You can also setup a proxy in this stage if you need one.

vum7

If you have the VI toolkit for PowerShell installed you get a bonus of the Update Manager toolkit being installed as well.

vum8 

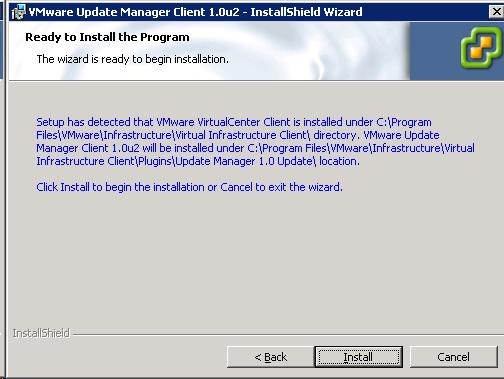
Now you can install the plugin via the Virtual Center client's Plugin Manager to install VMware Update Manager Extension version 1.0u2

vum9

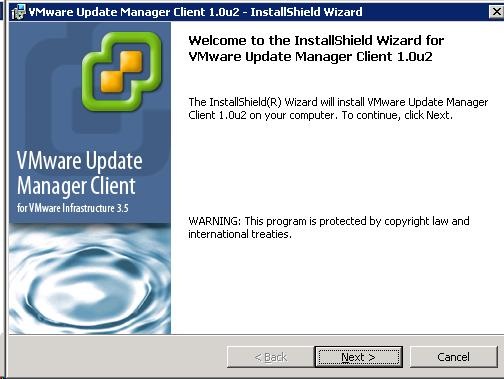
After selecting your language preference you are presented with another installer.

vum10

Thoroughly read the legal notice and accept it.

vum11

The install will now continue and exit normally. 

To enable the plugin,  you need to check the Enabled checkbox on the Plugin Manager's installed plugins tab. vum12

Now you will see a button for Update Manager in the toolbar.  

vum13


In my next post I will go into the configuration of VMware Update Manager, such as setting update frequency, and controlling what updates are downloaded.

In case you need to change the location where your updates are being stored.  Gabe over at Gabe's Virtual World has an article on how to change the location of the updates : http://www.gabesvirtualworld.com/?p=28

Wednesday, September 17, 2008

Coming Attractions - PowerShell for XenServer

Citrix continues their announcements this week with the announcement of their very own PowerShell SnapIn for managing XenServer environments.  

"Now that XenServer and XenCenter 5.0 have been released, we turn our attention to other things. One of those new projects is a PowerShell SnapIn for XenServer, which I'm pleased to announce today.
The new SnapIn is with private beta testers now, and will be available through this site very soon. "

It seems most of the Citrix announcements are getting lost in all the great announcements from VMworld.   Unfortunately I couldn't make it to VMworld this year, but luckily fellow virtualization bloggers like Rich Bramley at VM/ETC and Scott Lowe at his self-titled blog are keeping the rest of us up to date on the latest happenings.  

One "off beat" story coming out of VMworld is about a reported  guerilla marketing campaign , that either is either a surprisingly aggressive attack focused on VMware at their own conference, or a great big hoax.   Personally my bet is on big hoax,  but only Microsoft and the individual that registered the website know for sure at this point in time. 

Monday, September 15, 2008

XenServer 5 - Initial Impressions

You have to love VMworld,  it seems to bring out the best in the virtualization industry.   Last week was Microsoft's big announcement, and today Citrix had a big announcement of their own.   Unfortunately I couldn't make it to VMworld this year,  but that did afford me an opportunity to take a look at XenServer's new release.   I will be using XenServer 5.0 Express for the purposes of my testing.

I started with the "check for upgrades" I praised in a previous blog, expecting to be informed that there was a new version.   Using XenCenter 4.1 it did not see any new updates.  Since it was just released today,  I can cut them a break on that.

When I downloaded the XenCenter upgrade,  I noticed the filename contained "RC4".   That is not enough to worry me, yet. 

My first step was updating the client,  as I have learned from VMware.. always update the management tools first.   On launching the new version of XenCenter I received a dialog letting me know that checking for updates could now be scheduled.   A very nice addition to an already convenient feature.

xencenter5-1

After upgrading XenCenter to version 5.0.0 the upgrade tool was even more confused about available versions.  Not being able to recognize 5.0.  Hopefully this will be taken care of shortly.  

xencenter5-2 

The server upgrade process is much like the initial installation process.  When performing the upgrade the installer creates a backup of the current installation on the backup partition, which you can restore with the host-restore function.  a very nice safety net.  Dmitry Kushak expands on this process on the Citrix forum

At this point - my installation ceases to function at this point, informing me that a base installation could not be found when using the cdrom installation source.   Another user indicated that he downloaded the ISO again,  and did not have the same issue.   I tried that but it didn't help.   So I copied the CD up to my webserver, and attempted to do use the http install method instead of the cd based installation.   This installation worked.  Very odd that it worked, considering I used the same media that wouldn't boot for the webserver source.

On reboot the new bootloader and xsconsole feature are very apparent.  Now after a XenServer splash screen it boots to the xsconsole menu.xencenter5-3

This is a very nice interface that allows you to perform administrative tasks without memorizing commands.   For example - start a VM.

xencenter5-4

Interact with your storage repositories

xencenter5-5

Configure and test your network connections:

xencenter5-6

Overall it looks like XenServer is making some moves to be more competitive with VMware, as their HA solution is starting to look quite a bit like VMware's version.   I also see in the release notes some new guest support and a fair amount of new hardware support, such as 8GB HBAs and 10G NICs.   For a more complete list of features download the release notes or check out Peter Levine's blog entry

One new guest note stood out for me :

"Windows Server 2008 32-bit and 64-bit support, with WHQL signed para-virtual drivers and initial enlightenment
optimizations."

I think that is the first time I have seen the use of enlightenment optimizations outside of Microsoft's Hyper-V materials.    A search  on Windows paravirtualization turns up an interesting article about the importance of installing the guest tools.  

All in all, the update experience was pretty good, outside of the CDROM installation media issue.   Now the download experience,  that was not not pleasant.   I would expect Citrix to want to keep track of who downloaded their software, as it could lead to future sales.   I also don't mind filling out a short survey... once.   During the process of writing this article,  I had to fill out the survey 6 times.  It wasn't just for downloading XenServer or XenCenter itself,   it was also for downloading the documentation.   If you closed the browser - you have to fill out the survey again.   Even if you login to your MyCitrix account, you still have to fill out the survey again.   There's a fine line between collecting valuable marketing information and driving off customers - and I would hate to see Citrix on the wrong side of that line. 

xencenter5-7 

Update:

Jonathan Thorpe of Citrix jumped on the problem with the CDROM installation method (I guess I'm not the only person not at VMworld today) and pointed me toward a workaround that will allow me to install from CD media.   it is simply to drop to a shell during the installation (press F2) and type "lsmod ide-generic".   It appears that this module needed to be loaded for the installer to recognize my particular combination of Motherboard and IDE DVD drive.    you can read about it here: http://forums.citrix.com/thread.jspa?messageID=1341120&

Thank Jonathan! 

Monday, September 8, 2008

Microsoft Shakes Up the Virtualization World Yet Again

Today was a big day full of announcements for Microsoft, as most of these announcements have been covered in detail by other bloggers, I am going to link to their stories and give my own analysis and commentary instead of asking everyone to read the same press releases.

First up - Microsoft Hyper-V Server 2008 

One thing I have heard consistently when discussing Hyper-V is that "You still have to buy an operating system license.  So ESX3i and XenServer Express are still cheaper. "

Pretty soon that will not be true anymore,  as Microsoft announced that not only will their new bare metal, designed from the ground up hypervisor be released with 30 days,  it will be free, which happens to be my favorite price.    

Virtualization.info has an excellent article on the Virtual Server 2008 announcement today. Release : Microsoft Hyper-V 1.0

Next up : System Center Virtual Machine Manager 2008

This will be released within 30 days.   One thing I found surprising about this announcement is that they will support management of VMware VI3, they will not be supporting XenServer.  I would not have expected this, considering how close Citrix and Microsoft are these days.

Lastly on the server virtualization side was Live Migration. 

Microsoft seems to have realized that the lack of Live Migration was holding them back from competing directly with VMware, especially when it comes to Enterprise class environments.  the good news is that it will be released with Windows 2008 R2.  The bad news..it will likely not be in our hands until 2010.  

I think this is a great announcement for all the consumers of virtualization technology,  as VMware, Microsoft, and Citrix will all be pushing to achieve the be the leader in the virtualization market of the future.   To use a boxing metaphor, VMware is still the undisputed champion today, but they will need to fight hard to stay there. 

Read Yellowbricks.com's scoop on the subject : FYI: Microsoft’s live migration

There were many other announcements including :

Definitely a big day for press releases.

Friday, September 5, 2008

A Hands On Review of SearchMyVM

In my last post I discussed the OVF import process, so after some hands on experience with the SearchMyVM appliance, I'm ready to give my impressions.

Let me apologize in advance for where I have edited the screenshots.  I have removed anywhere that it referenced our server names or IP addresses. 

Starting with initial bootup you are presented with a text based menu to setup your network configuration
 
searchmyvm6
After confirming your IP information, your DNS, and an NTP server you are directed to connect to the IP address of the server where you are presented with a "google-like" screen that presents you with some sample queries. 
 
searchmyvm 
First you will need to point to your Virtual Center.   You will need to use the FQDN for your server, and provide a user id that has the ability to read objects.  
searchmyvm0
 
So now it SearchMyVM will index your VMware Environment.   In our environment it only took about 15 minutes until all the information showed up.   You may receive incomplete query responses until the index is built.  
 
So If you need a function that is not on the common list there is a visual query editor that allows you to build simple or complex queries from a series of drop down lists.  They fully explain all objects, including the type of parameter
 
searchmyvm2
searchmyvm3
 
Additionally if you would like to read additional information about each parameter you can access the detailed help files from the main interface screen.
 
searchmyvm5
 
The results returned are static, you can't click on them or export them from within the interface (although there are some PowerShell techniques for exporting web data)
 
searchmyvm4
 
In summation, here's my impressions of the appliance.
 
Key strengths :
  • Extremely easy configuration.  You can have this appliance up and running within 15 minutes.
  • Support for the OVF format.   This cuts down the provisioning time dramatically.
  • Fast Indexing - Our indexing appeared to cover 500 guests and 25 hosts within 15 minutes of connecting to virtual center.  Although I was only searching for base objects like virtual machines and hosts at that time, other objects like VMware Tools status may have taken longer. 
  • Very well written help files and examples  - I don't see any written documentation available on their website yet, but the help files contained within the appliance are more than enough to get started.

Thing I would like to see in future releases:

  • The ability to export query results to remote shares.  Being able to view query results is good, but being able to *use* query results would make this product a must have.
  • The ability to drill down into search results.   Search results are currently static. 
  • Plain English queries.   Currently the query format is very structured, it would be nice to be able to use commands like "show vms with attached cdrom". 
  • Support for SCVMM and XenCenter.  

Vkernel has setup up a section of their forum for discussing the product at http://www.vkernel.com/forum/viewtopic.php?t=120 .   If you would like to contribute, you will need to register with their forum.     I will be watching future releases of the appliance as it appears to have potential, especially for large environments that lack PowerShell scripting talent.